

GitHub OAuth Apps let users log in to your app using their GitHub account. You can also take actions on behalf of users using the GitHub API, like posting comments or closing pull requests. In this article, I'll explain how to support GitHub login using Node.js and Express, and how to use the GitHub API once you've got an access token for the user.
Supporting GitHub Login
Most tutorials use Passport, but Passport is usually unnecessary. This tutorial will use vanilla Express, with no dedicated OAuth frameworks.
The web OAuth 2.0 login flow has 3 steps:
- Your app client redirects to GitHub with your app's id and a URL to redirect the user to when they successfully authorize your app.
- The dialog redirects back to your app client's domain with an auth code in the query string. An auth code is a short-lived code that you can exchange for a long-lived access token.
- Your app pulls the code parameter from the query string, and makes a POST request to the GitHub with the access code. GitHub verifies the access code and sends back an access token your app can use for authorization going forward. Your app is responsible for storing the access token.
When implementing Passport-free OAuth login, you need 3 routes:
- A route that displays a UI which can redirect to GitHub to log in.
- A route that exchanges an auth code for an access token and stores the access token.
- A route that does something with the access token.
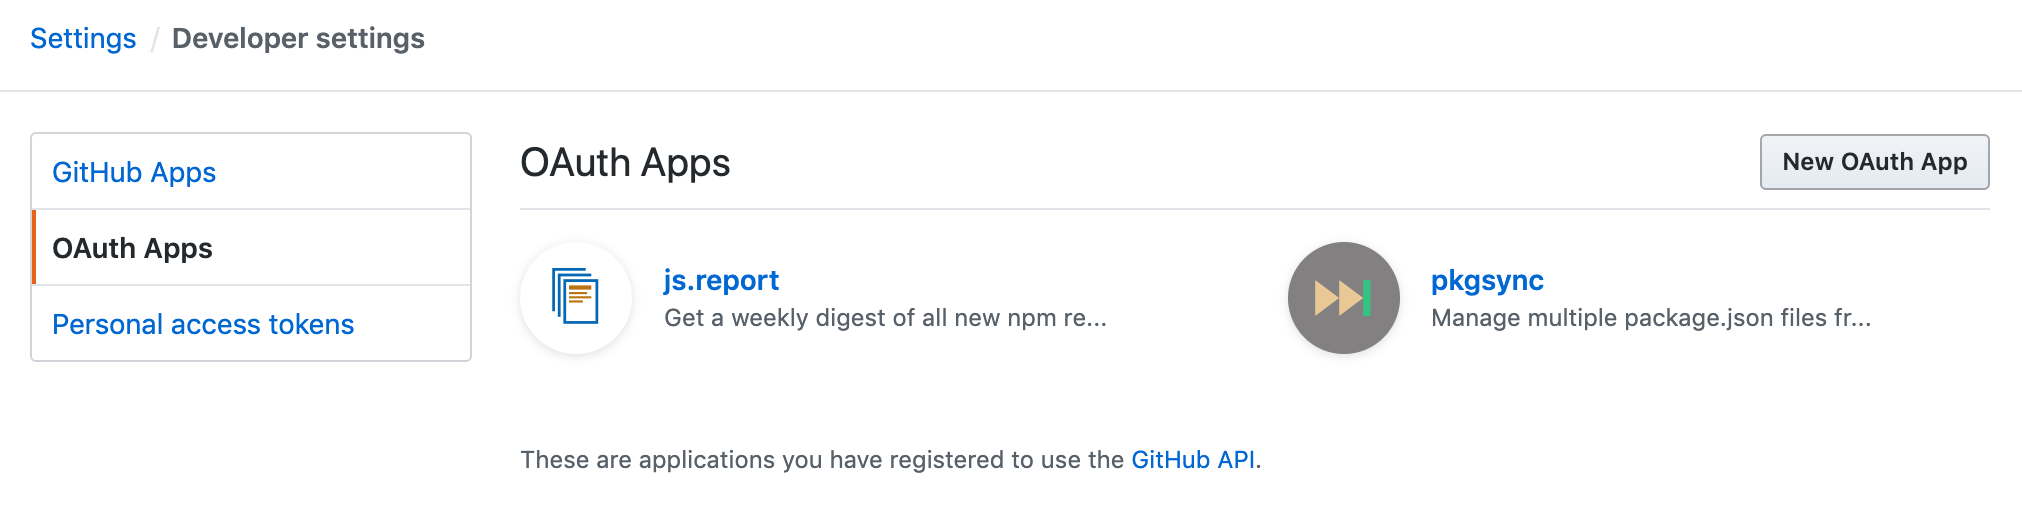
First, you need to create a GitHub OAuth App. Go to your Developer Settings page and click "New OAuth App." Make sure you create a new OAuth App, not a new GitHub App.
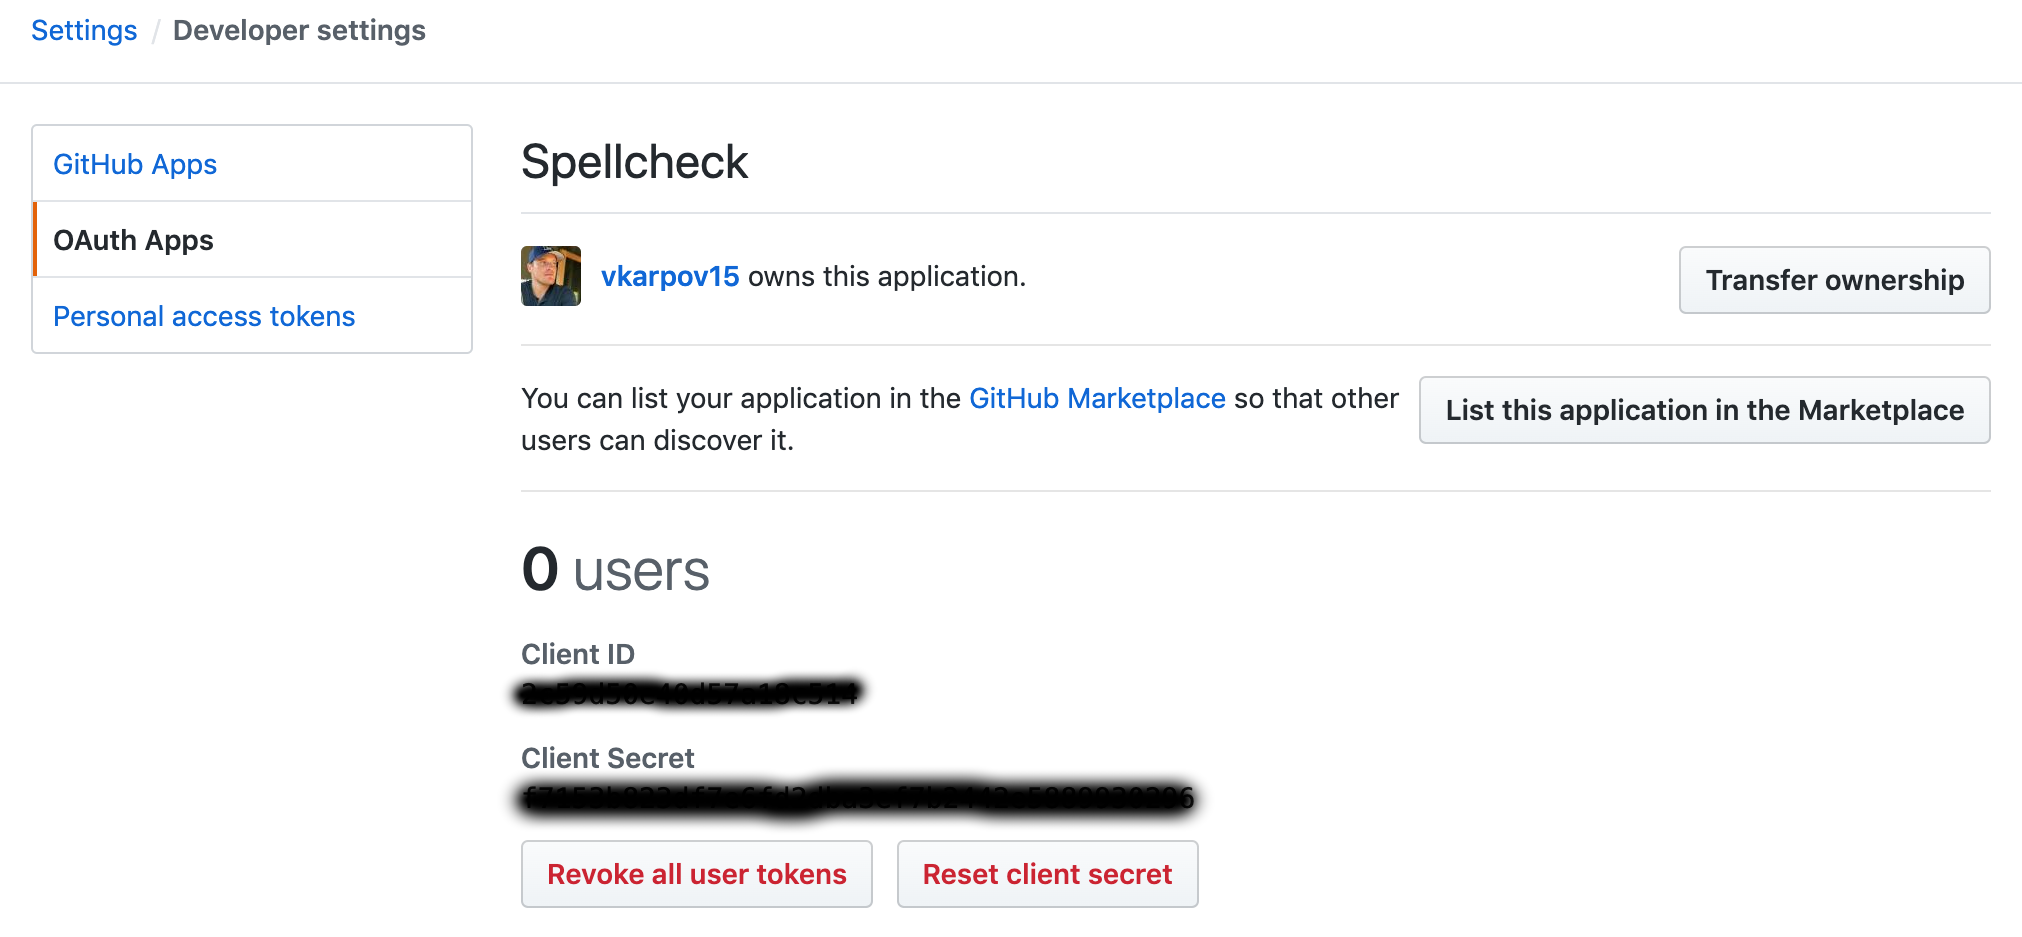
Create a new GitHub OAuth App with http://localhost:3000/oauth-callback as the
OAuth redirect URL. Once you've created a GitHub OAuth App, note the Client Id and Client Secret:
Now that you have a Client Id and Client Secret, you can build a minimal Express API that redirects to GitHub to authorize your app:
const express = require('express');
const app = express();
const clientId = 'OMITTED';
const clientSecret = 'OMITTED';
app.get('/', (req, res) => {
res.redirect(`https://github.com/login/oauth/authorize?client_id=${clientId}`);
});
app.listen(3000);
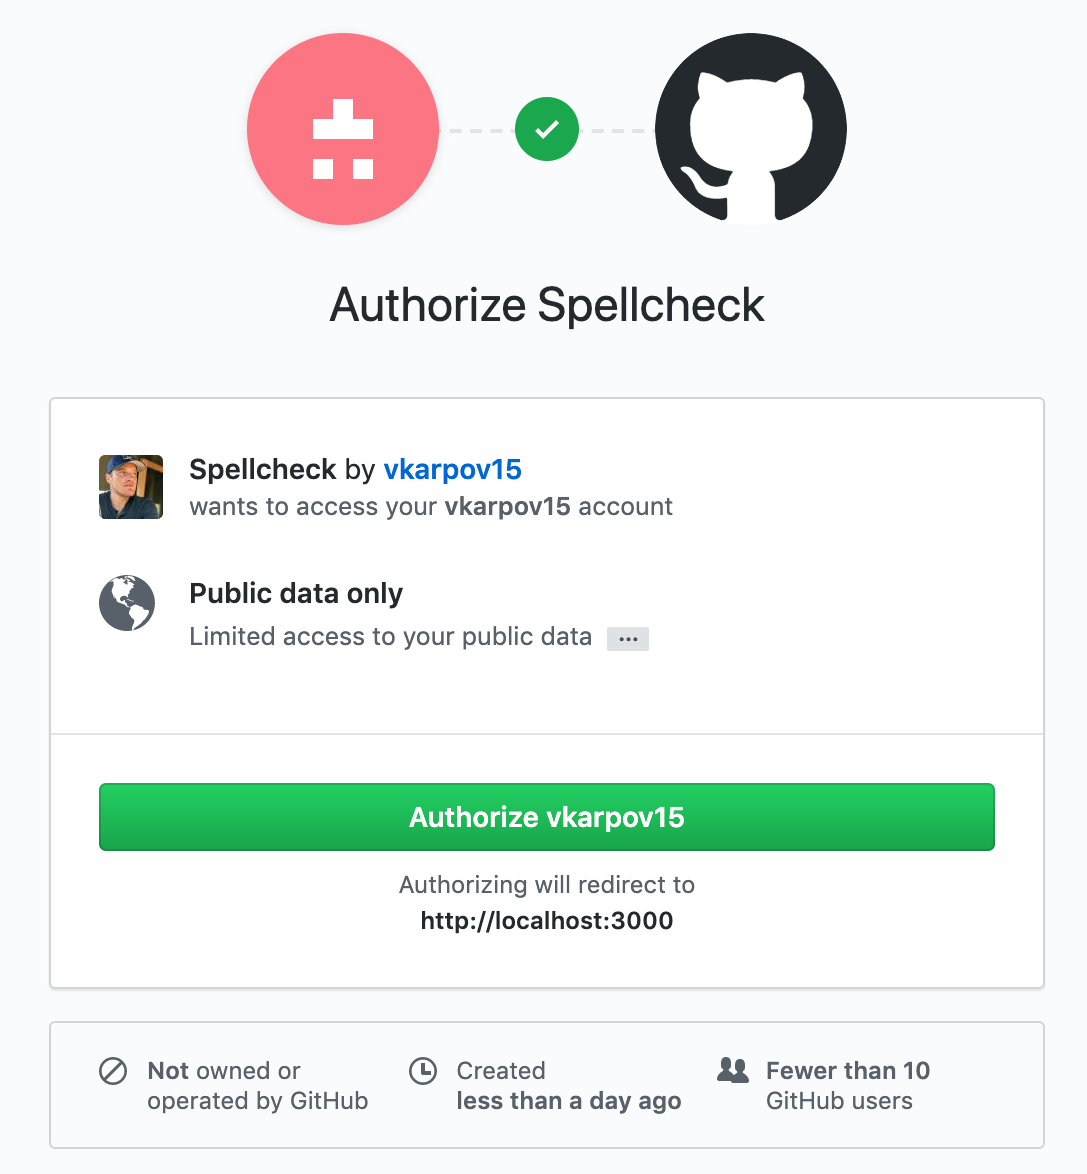
console.log('App listening on port 3000');Run this app, go to http://localhost:3000, and you'll see a GitHub login screen.
When you log in, GitHub will redirect to your redirect URL, which should be
http://localhost:3000/oauth-callback, with a code parameter in the query
string. Your Express server needs to then make an HTTP POST request to https://github.com/login/oauth/access_token to exchange this access code for an access
token. Your app should store this access token in a database like MongoDB.
But, for the sake of a simple example, let's keep the access token in memory.
const axios = require('axios');
let token = null;

app.get('/oauth-callback', (req, res) => {
  const body = {
    client_id: clientId,
    client_secret: clientSecret,
    code: req.query.code
  };
  const opts = { headers: { accept: 'application/json' } };
  axios.post(`https://github.com/login/oauth/access_token`, body, opts).
    then(res => res.data['access_token']).
    then(_token => {
      console.log('My token:', token);
      token = _token;
      res.json({ ok: 1 });
    }).
    catch(err => res.status(500).json({ message: err.message }));
});
Now, you can go all the way through the GitHub OAuth flow and get a GitHub token. That's how you can handle logging in with GitHub, next let's use the token to make some basic API requests.
Making a Request to the GitHub API
GitHub OAuth App scopes determine what permissions your OAuth App has. By default, your OAuth App just gets access to some basic public information about the user. But you can add scopes that allow your OAuth app to take actions on behalf of your user.
To edit comments, you need the repo scope. To get the repo scope, you need to add it to the URL that you redirect users to.
app.get('/', (req, res) => {
  res.redirect(`https://github.com/login/oauth/authorize?client_id=${clientId}&scope=repo`);
});
Make sure you re-authenticate and get a new access token. Once you have an access token, you can use the GitHub comments API to list all comments on a repo. For example, here's how you can use Axios to get all the comments on this blog's GitHub repo. Since this repo is public, no token required.
await axios.get('https://api.github.com/repos/vkarpov15/thecodebarbarian.com/issues/comments').
  then(res => res.data);
Below is the output:
[ { url:
     'https://api.github.com/repos/vkarpov15/thecodebarbarian.com/issues/comments/70603151',
    html_url:
     'https://github.com/vkarpov15/thecodebarbarian.com/pull/1#issuecomment-70603151',
    issue_url:
     'https://api.github.com/repos/vkarpov15/thecodebarbarian.com/issues/1',
    id: 70603151,
    node_id: 'MDEyOklzc3VlQ29tbWVudDcwNjAzMTUx',
    user:
     { login: 'vkarpov15',
       id: 1620265,
       node_id: 'MDQ6VXNlcjE2MjAyNjU=',
       avatar_url: 'https://avatars2.githubusercontent.com/u/1620265?v=4',
       gravatar_id: '',
       url: 'https://api.github.com/users/vkarpov15',
       html_url: 'https://github.com/vkarpov15',
       followers_url: 'https://api.github.com/users/vkarpov15/followers',
       following_url:
        'https://api.github.com/users/vkarpov15/following{/other_user}',
       gists_url: 'https://api.github.com/users/vkarpov15/gists{/gist_id}',
       starred_url:
        'https://api.github.com/users/vkarpov15/starred{/owner}{/repo}',
       subscriptions_url: 'https://api.github.com/users/vkarpov15/subscriptions',
       organizations_url: 'https://api.github.com/users/vkarpov15/orgs',
       repos_url: 'https://api.github.com/users/vkarpov15/repos',
       events_url: 'https://api.github.com/users/vkarpov15/events{/privacy}',
       received_events_url: 'https://api.github.com/users/vkarpov15/received_events',
       type: 'User',
       site_admin: false },
    created_at: '2015-01-20T04:31:18Z',
    updated_at: '2015-01-20T04:31:18Z',
    author_association: 'OWNER',
    body: 'Thanks!\n' },
  ...
While you don't need a token to read the comments, you do need one to edit a comment. Each comment has an id property, for example, 70603151. To edit a comment, you need to make an HTTP PATCH request to /repos/vkarpov15/thecodebarbarian.com/issues/comments/:comment_id, with token: ${accessToken} as the authorization header.
// Replace 'Thanks' with 'Thank You' in the comment text.
axios.patch(`https://api.github.com/repos/vkarpov15/thecodebarbarian.com/issues/comments/${id}`, {
  body: comment.body.replace('Thanks', 'Thank You')
}, { headers: { authorization: `token ${token}` } });
GitHub Apps vs OAuth Apps
GitHub Apps are actually a completely different concept from GitHub OAuth Apps. There are 2 major differences:
1) An OAuth app takes action on behalf of a user, whereas a GitHub App is a distinct user. For example, if you log in to a GitHub OAuth app and the OAuth app posts a comment on an issue, that comment will be associated with your GitHub username. On the other hand, if a GitHub App posts on an issue, that comment will be associated with the GitHub App rather than any individual user.
2) OAuth Apps are scoped to an individual user and have the same permissions as that user. GitHub Apps are scoped to an organization or a subset of an organization. This has important implications for installing your app: if you aren't an admin on an organization, you need to request permission to install a GitHub App that interacts with that repo. For example, since the Mongoose GitHub repo is under Automattic's organization, I can't install a GitHub App on the Mongoose repo without Automattic's help. But I can install an OAuth App that pushes to the repo, because OAuth Apps have a subset of my permissions as a GitHub user.
Moving On
Once you wrap your head around the authentication quirks, the GitHub API is pleasant to work with and has a lot of useful features. With OAuth Apps, you can automate repetitive tasks, like checking comment code examples, fixing spelling mistakes, and closing stale issues. OAuth Apps also have a simpler permission model than GitHub Apps - your OAuth App has the same permissions you do as the authorizing user. Try building your own GitHub OAuth App next time you find yourself dreading scrolling through a bunch of issues.