

"CLI" stands for "command-line interface". CLIs are tools that let you be productive from the shell. Common CLI tools include curl, Vue's CLI, and the Amazon Web Services CLI.
You can further break down CLIs into various types. In the JavaScript ecosystem, there are many CLIs that help you create new projects, like Vue's CLI, create-react-app, and yeoman. Some of these CLI tools take it one step further and write code for you after creating a new project, like the Angular CLI. Other CLIs provide a user-friendly interface for APIs, like the AWS CLI, Kubernetes' kubectl tool, or GitHub's CLI.
In this article, I'll walk you through how to set up a basic CLI tool for the Slack API, including how to post messages from the command line.
Command Line Arguments
The first thing almost every CLI needs is an argument parser, something that parses the --file part of
my-cli-tool --file ./package.json. There are a lot of modules that parse command line arguments on npm, but
I prefer yargs: the API is easy to work with, and the docs have pirate jokes.
Run npm install yargs.
The first order of business is to make a tool that can handle the command slack postMessage --channel test "Hello, World". slack
is the name of the tool, postMessage is a command, and --channel test and "Hello, World" are arguments. Here's how
you can write a script that can parse this command using yargs:
'use strict';

const yargs = require('yargs');

yargs.command(
  'postMessage [message]', // Command name, plus a positional argument `message`
  'Send a message', // Command description for `--help` output
  yargs => {
    // Add extra arguments to `postMessage`
    yargs.positional('channel', { describe: 'The channel to send the message to', default: 'test' });
  },
  function handler(argv) {
    // Handler function. This is where you should implement the command
    console.log(`Send message to channel #${argv.channel}: ${argv.message}`);
  });

// Need to access `yargs.argv`, otherwise yargs won't do anything.
yargs.argv;
That's it! If the above script is index.js, you can run the above script and get the below output.
$ node ./index.js postMessage --channel test2 "Hello, World"
Send message to channel #test2: Hello, World
$
Here are the yargs command docs.
Token Storage
So now that you can parse command line arguments, you're almost ready to make a request to the Slack API. But, to
do that, you need an API token. Rather than asking for the user's API token every time they want to make a request,
it's generally better to expose a separate login command that asks the user to enter in their token, and then
store it in a file.
Ideally, the user could just log in using OAuth rather than entering in their token. But OAuth is a more complex
process with CLI tools, so I'll cover that in another tutorial. Plus, the login command is the perfect
opportunity to introduce one of my favorite npm modules: enquirer (not to be confused with inquirer).
Enquirer is a tool for command line prompts. It has a neat prompt() function that lets you prompt the user for input. Here's how you can use prompt() to ask the user for their token when they run slack login:
const { prompt } = require('enquirer');

yargs.command(
  'login',
  'Set your bot token',
  () => {},
  async function handler(argv) {
    const { token } = await prompt({
      type: 'password',
      name: 'token',
      message: 'Enter your Slack bot token:'
    });
  });
Once the user's entered their token, you need to store it somewhere. One common tool for this is configstore, which automatically persists a JavaScript object to the ~/.config/configstore directory on
Linux and OSX. Here's how you can use configstore to store the token the user enters.
const Configstore = require('configstore');
const { prompt } = require('enquirer');
const yargs = require('yargs');

// `slack-cli` is the name of the file that configstore will use.
const config = new Configstore('slack-cli');

yargs.command(
  'login',
  'Set your bot token',
  () => {},
  async function handler(argv) {
    const { token } = await prompt({
      type: 'password',
      name: 'token',
      message: 'Enter your Slack bot token:'
    });

    config.set({ token });
    console.log('Token stored successfully!');
  });
Sending the Slack Request
Now, back to the postMessage command. To send a message to Slack, this command needs to make a POST request to
the Slack API using an HTTP client like axios. It also needs to pull the API token
from configstore.
You can follow this tutorial to get a Slack API token. Once you have a Slack token, here's how you can send a "Hello, World" message using the Slack API and axios:
const axios = require('axios');

const slackToken = 'xoxb-YOUR-TOKEN_HERE';

const url = 'https://slack.com/api/chat.postMessage';
const res = await axios.post(url, {
  channel: '#test',
  text: 'Hello, World!'
}, { headers: { authorization: `Bearer ${slackToken}` } });
Now, let's glue this code into the postMessage command. The channel and test arguments should come from yargs,
and the slackToken should come from configstore. Here's how the full postMessage command looks:
const Configstore = require('configstore');
const axios = require('axios');
const yargs = require('yargs');
const config = new Configstore('slack-cli');
const url = 'https://slack.com/api/chat.postMessage';
yargs.command(
'postMessage [message]',
'Send a message',
yargs => {
// Add extra arguments to `postMessage`
yargs.positional('channel', { describe: 'The channel to send the message to', default: 'test' });
},
async function handler(argv) {
// Get the token from configstore
const token = config.get('token');
if (!token) {
return console.log('Must be logged in!');
}
// Send the message to the specified channel.
const res = await axios.post(url, {
channel: '#' + argv.channel,
text: argv.message
}, { headers: { authorization: `Bearer ${token}` } });
if (!res.data.ok) {
return console.log('Error!', res.data.error);
}
console.log(`Sent message to channel #${argv.channel}: ${argv.message}`);
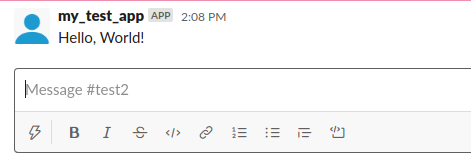
});That's it! Here's how you can run the postMessage command:
$ node ./index.js postMessage --channel test2 "Hello, World"
Sent message to channel #test2: Hello, World
$
Here's what the above message looks like in Slack:
Bundling for npm
I published the above code to npm as the @vkarpov15/slack-cli-test module.
After running npm install @vkarpov15/slack-cli-test, you should be able to run ./node_modules/.bin/slack-cli as
shown below.
$ npx slack-cli postMessage --channel test2 "Hello, World"
Sent message to channel #test2: Hello, World
$
There are two additions you need to make to make the index.js file runnable. First, the entry point to your
executable should start with #!/usr/bin/env node. For example:
#!/usr/bin/env node

'use strict';

const Configstore = require('configstore');
const axios = require('axios');
const { prompt } = require('enquirer');
const yargs = require('yargs');

const config = new Configstore('slack-cli');
const url = 'https://slack.com/api/chat.postMessage';

// ...
Second, your package.json should contain a bin property that maps executable names to entry points. Below is the
package.json file for the slack-cli-test module, notice the bin property defines the name of the executable
as "slack-cli".
{
  "name": "@vkarpov15/slack-cli-test",
  "version": "0.0.1",
  "bin": {
    "slack-cli": "./index.js"
  },
  "dependencies": {
    "axios": "^0.19.2",
    "configstore": "^5.0.1",
    "enquirer": "^2.3.6",
    "slack": "^11.0.2",
    "yargs": "^15.4.1"
  }
}
Moving On
Beside being fun to build, CLIs are exceptionally useful. A well documented CLI can make a project or API much easier to use. There's a wide variety of CLI tools out there in addition to yargs and enquirer: some other popular npm modules for CLIs include boxen, chalk, ink, ora, and oclif. Next time you're looking for a fun side project, try building a CLI!