

Passport is the de facto standard for OAuth in Node.js. Most Facebook login tutorials for Node.js use Passport. However, you don't necessarily need to use Passport: it's a great framework, but using a framework robs you of the opportunity to learn how to do it yourself. Plus Passport might be overkill if you don't want to support multiple OAuth providers.
With that in mind, here's how you can build a basic Facebook OAuth flow with Express, but without Passport or any dedicated OAuth libraries.
High Level Overview
Your standard web OAuth 2.0 flow has 3 steps:
- Your app client opens a Facebook login dialog with your app's id and a URL to redirect the user to when they successfully authorize your app.
- The dialog redirects back to your app client's domain with an auth code in the query string. An auth code is a short-lived code that you can exchange for a long-lived access token.
- Your app pulls the
codeparameter from the query string, and makes a POST request to the Facebook with the access code. Facebook verifies the access code and sends back an access token your app can use for authorization going forward. Your app is responsible for storing the access token.
That means, to implement Facebook login, your Express app needs 3 routes:
- A route that displays a UI which can open Facebook's login dialog.
- A route that exchanges an auth code for an access token and stores the access token.
- A route that does something with the access token.
In this article, you'll see how to implement these 3 routes, and how to store access tokens in MongoDB using Mongoose.
In-Memory Implementation
First, let's create a route that links the user to Facebook's login dialog. In the interest of keeping this example lean, no need for any templating languages. Just plain old HTML strings.
// Route 1: UI to redirect the user to Facebook's login dialog
app.get('/', (req, res) => {
  res.send(`
    <html>
      <body>
        <a href="https://www.facebook.com/v6.0/dialog/oauth?client_id=${appId}&r
edirect_uri=${encodeURIComponent('http://localhost:3000/oauth-redirect')}">
          Log In With Facebook
        </a>
      </body>
    </html>
  `);
});
The above route just displays some HTML with a single link. The only detail
worth noting is the appId variable in the URL. In order to do Facebook login, you need
to register an app on developers.facebook.com and take the "App ID" and
"App Secret" from your app's details page.
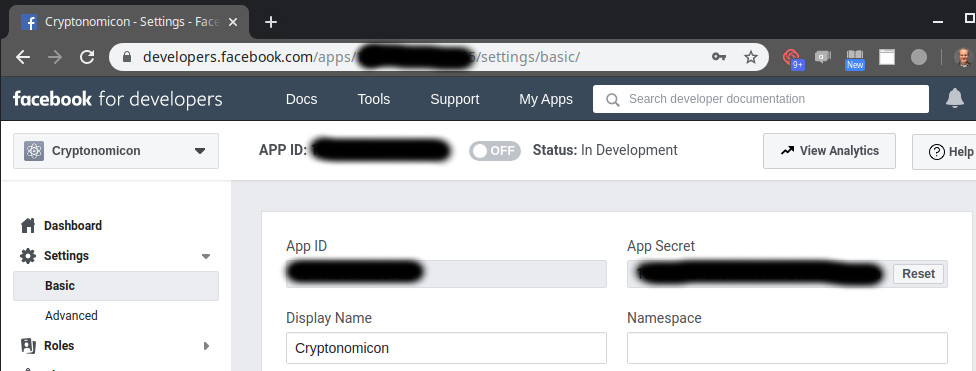
For the purposes of this article, I'll assume that your "App ID" is in the
appId variable, and your "App Secret" is in the appSecret variable.
The Facebook dialog URL also includes a redirect_uri parameter. That tells
Facebook where to redirect with the auth code when the user has authorized
your app. So you need to implement a /oauth-redirect endpoint that
exchanges the auth code for an access token. To exchange an auth code
for an access token, you need to make an API request to the /access_token endpoint:
const axios = require('axios');
const accessTokens = new Set();

// Route 2: Exchange auth code for access token
app.get('/oauth-redirect', async (req, res) => {
  try {
    const authCode = req.query.code;

    // Build up the URL for the API request. `client_id`, `client_secret`,
    // `code`, **and** `redirect_uri` are all required. And `redirect_uri`
    // must match the `redirect_uri` in the dialog URL from Route 1.
    const accessTokenUrl = 'https://graph.facebook.com/v6.0/oauth/access_token?' +
      `client_id=${appId}&` +
      `client_secret=${appSecret}&` +
      `redirect_uri=${encodeURIComponent('http://localhost:3000/oauth-redirect')}&` +
      `code=${encodeURIComponent(authCode)}`;

    // Make an API request to exchange `authCode` for an access token
    const accessToken = await axios.get(accessTokenUrl).then(res => res.data['access_token']);
    // Store the token in memory for now. Later we'll store it in the database.
    console.log('Access token is', accessToken);
    accessTokens.add(accessToken);

    res.redirect(`/me?accessToken=${encodeURIComponent(accessToken)}`);
  } catch (err) {
    console.log(err);
    return res.status(500).json({ message: err.response.data || err.message });
  }
});
At this point, the user is already logged in. Your app now has an
access token that it can use to make requests to Facebook on behalf of the
user. All that's left is to make a request to Facebook. The /me endpoint returns the name of the logged in user:
// Route 3: Make requests to FB on behalf of the user
app.get('/me', async (req, res) => {
  try {
    const accessToken = req.query.accessToken;
    if (!accessTokens.has(accessToken)) {
      throw new Error(`Invalid access token "${accessToken}"`);
    }

    // Get the name and user id of the Facebook user associated with the
    // access token.
    const data = await axios.get(`https://graph.facebook.com/me?access_token=${encodeURIComponent(accessToken)}`).
      then(res => res.data);

    return res.send(`
      <html>
        <body>Your name is ${data.name}</body>
      </html>
    `);
  } catch (err) {
    console.log(err);
    return res.status(500).json({ message: err.response.data || err.message });
  }
});
Storing Access Tokens in Mongoose
The above example skips over several important steps. Instead of storing
the access token in a Set, you'll want to store the token in a database
like MongoDB. Also, instead of passing around the access token in the
query string, you should store the access token in window.localStorage
for a single page app, or in a cookie for a more traditional webapp.
Using Mongoose, you can create an AccessToken model
that you can use to store access tokens in MongoDB.
const mongoose = require('mongoose');

const schema = new mongoose.Schema({
  // Use the `accessToken` string itself as `_id` so you get an
  // index for fast queries.
  _id: String,
  userId: String
});

const AccessToken = mongoose.model('AccessToken', schema);
Below are the new Route 2 and Route 3 implementations that use Mongoose to store access tokens:
// Route 2: Exchange auth code for access token
app.get('/oauth-redirect', async (req, res) => {
  try {
    const authCode = req.query.code;

    const accessTokenUrl = 'https://graph.facebook.com/v6.0/oauth/access_token?' +
      `client_id=${appId}&` +
      `client_secret=${appSecret}&` +
      `redirect_uri=${encodeURIComponent('http://localhost:3000/oauth-redirect')}&` +
      `code=${encodeURIComponent(authCode)}`;

    const accessToken = await axios.get(accessTokenUrl).then(res => res.data['access_token']);

    // Store the access token in MongoDB, skip the userId for now
    await AccessToken.create({ _id: accessToken });

    res.cookie('accessToken', accessToken, { maxAge: 900000, httpOnly: true });
    res.redirect(`/me?accessToken=${encodeURIComponent(accessToken)}`);
  } catch (err) {
    console.log(err);
    return res.status(500).json({ message: err.response.data || err.message });
  }
});

// Route 3: Make requests to FB on behalf of the user
app.get('/me', async (req, res) => {
  try {
    const accessToken = String(req.cookies.accessToken);
    // Make sure the token is in the database
    const tokenFromDb = await AccessToken.findOne({ _id: accessToken });
    if (tokenFromDb == null) {
      throw new Error(`Invalid access token "${accessToken}"`);
    }

    const data = await axios.get(`https://graph.facebook.com/me?access_token=${encodeURIComponent(accessToken)}`).
      then(res => res.data);

    return res.send(`
      <html>
        <body>Your name is ${data.name}</body>
      </html>
    `);
  } catch (err) {
    console.log(err);
    return res.status(500).json({ message: err.response.data || err.message });
  }
});
To store the access token in a cookie, you should install Express' cookie-parser middleware. You can set a cookie using res.cookie() - here's how Route 2 can set the access token as a cookie.
// Route 2: Exchange auth code for access token
app.get('/oauth-redirect', async (req, res) => {
  try {
    const authCode = req.query.code;

    const accessTokenUrl = 'https://graph.facebook.com/v6.0/oauth/access_token?' +
      `client_id=${appId}&` +
      `client_secret=${appSecret}&` +
      `redirect_uri=${encodeURIComponent('http://localhost:3000/oauth-redirect')}&` +
      `code=${encodeURIComponent(authCode)}`;

    const accessToken = await axios.get(accessTokenUrl).then(res => res.data['access_token']);
    await AccessToken.create({ _id: accessToken });

    // Set a cookie. Handy when working with a traditional web app.
    res.cookie('accessToken', accessToken, { maxAge: 900000, httpOnly: true });
    res.redirect('/me');
  } catch (err) {
    console.log(err);
    return res.status(500).json({ message: err.response.data || err.message });
  }
});
And here's how Route 3 can read the cookie using the cookie parser middleware:
// Route 3: Make requests to FB on behalf of the user
app.get('/me', async (req, res) => {
  try {
    // Pull the access token from cookies, and validate it.
    const accessToken = String(req.cookies.accessToken);
    const tokenFromDb = await AccessToken.findOne({ _id: accessToken });
    if (tokenFromDb == null) {
      throw new Error(`Invalid access token "${accessToken}"`);
    }

    const data = await axios.get(`https://graph.facebook.com/me?access_token=${encodeURIComponent(accessToken)}`).
      then(res => res.data);

    return res.send(`
      <html>
        <body>Your name is ${data.name}</body>
      </html>
    `);
  } catch (err) {
    console.log(err);
    return res.status(500).json({ message: err.response.data || err.message });
  }
});
Moving On
Passport is a great framework that gives you a lot of great features out of the box. But sometimes, trying it out yourself is the best way to learn. Once you understand the core OAuth flow, implementing OAuth is just about filling out a couple of routes, and you can replicate a lot of Passport's features with just a few lines of code.